

EDIT: These values were updated and validated on 7/18/2012.
With the help of some MatLab code that I wrote, I recalculated my charge distances and accounted for some additional factors as well. I have these values in both tabular and graph form for quick reference. First though, some information on how I generated this data.
Since this is a computer, I did an exhaustive enumeration of the whole space for each calculation. For the layman, I did the equivalent of determining every single possible combination and then collected them to determine the probability of a successful charge. I have evaluated 3 cases so far:
(1) Standard 2d6 charge
(2) Charge through terrain - drop the lowest
(3) Charge with fleet
For the fleet rolls the calculation is a bit more complicated because the player has the option to reroll one or both of the charge dice. To determine which dice to reroll I applied some simple rules:
(1) If the charge fails, reroll the lowest of the two dice
(3) If the charge fails, reroll the higher of the two dice if the probability to successfully charge on 2d6 is better than on 1d6
The pretty plot form of these results are shown in the figure Probability of Success vs Charge Distance plot.

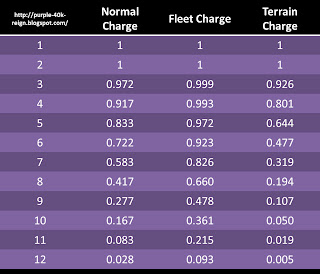
This chart is a quick reference to determine the chances of making that critical charge - and deciding whether or not to go for an easier target. As a quick reference point for these numbers, a fleet Daemonette used to average at least a 9" charge 66% of the time - which it now has a 55% chance to achieve, a 10" charge 50% of the time - which it now has a 36% chance to achieve and so on. Overall it is a reduction in threat range for those units.
Notably missing from this table is a calculation for charge distance through terrain with fleet. I am still working on the code for that case - and trying to determine the proper 'decision' rules to follow for re-rolls. Thus far my proposed rules are:
1 - Fleet rolls always reroll the lowest dice on fails
2 - If the chance to achieve charge distance on 2d6 is better than 1d6 on next lowest, reroll second dice
3 - If the chance to achieve charge distance on 3d6, drop highest is better than on 2d6 - reroll third dice
The problem is in calculating the chance of success for these cases which depends on both the third dice value, and the value of the rerolls. For example, on a 12" charge every non 6 is rerolled. For an 8" charge, however, should a 4 on the third dice be rerolled? If it is not, then the remaining two dice need to achieve a value of at least 4 on both dice for success, which has a 25% chance of success. On the other hand, if the 4 is rerolled, from the Terrain Charge chart we know the chance of success is 19.4% on 3d6 over 8" which suggests the dice should be left in favor of the 25%
Putting this all together to evaluate the decisions being made (rather than blindly evaluating the probability) provides a set of decision rules that can be consistently applied to achieve the probabilities as per the chart. Hopefully I will have this together by the end of the week with the wife and kidlet out for a bit.
No comments:
Post a Comment